
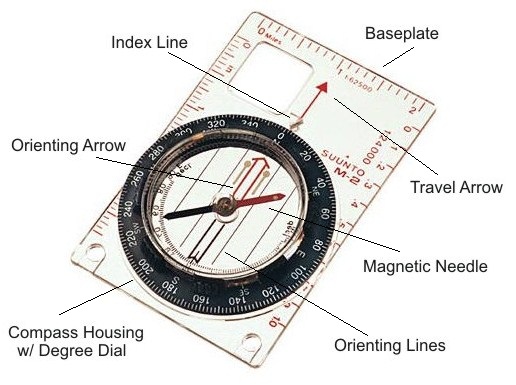
The Compass
A compass is a navigational instrument that measures directions in a frame of reference. The frame of reference defines the four cardinal directions - north, south, east, and west. A compass functions as a pointer to "magnetic north" because the magnetized needle at its heart aligns itself with the lines of the Earth's magnetic field. The magnetic field exerts a torque on the needle, pulling one end or pole of the needle toward the Earth's North magnetic pole, and the other toward the South magnetic pole. The needle is mounted on a low-friction pivot point.
The two types of North
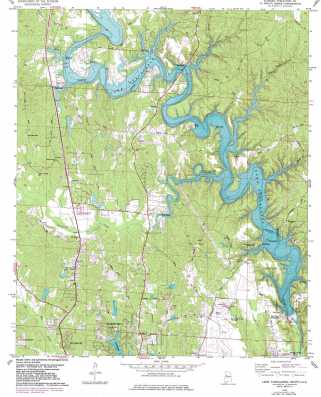
True North:is the geographic north pole where all longitude lines meet. True north is always at the top of a map. On maps published by the U.S. Geological Survey and the U.S. Armed Forces, true north is marked with a line terminating in a five-pointed star. The east and west edges of the USGS topographic quadrangle maps of the United States are meridians of longitude, thus indicating true north (so they're not exactly parallel).
Magnetic North: the direction a compass needle points is known as magnetic north. In general, this is not exactly the direction of the North Magnetic Pole (or of any other consistent location). Instead, the compass aligns itself to the local geomagnetic field, which varies in a complex manner over the Earth's surface, as well as over time.
Declination
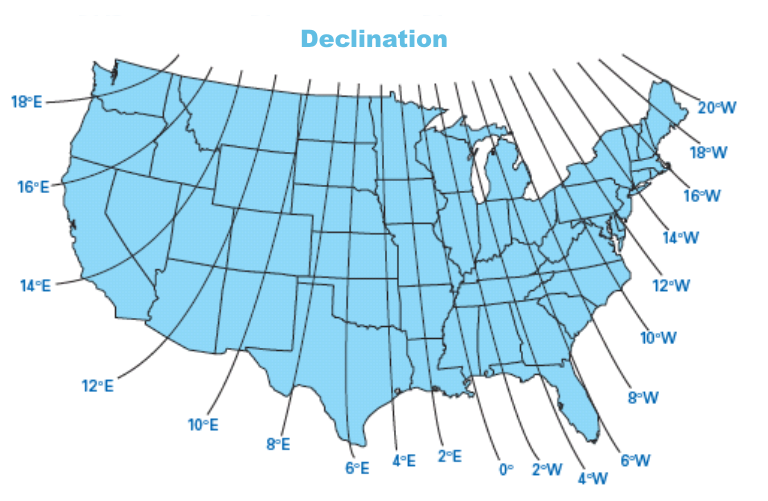
The local angular difference between magnetic north and true north is called the magnetic declination. Most map coordinate systems are based on true north, and magnetic declination is often shown on map legends so that the direction of true north can be determined from north as indicated by a compass. The magnetic field lines of the earth are constantly changing, moving slowly westward (.5 to 1 degree every five years). Because of the changing declination it is very important to have the most current map.
A map is drawn in relation to true north, a compass points to magnetic north. To navigate you must decide on one North as your point of reference and base all your calculations on that decision. Failing to account for declination can cause serious errors in your calculations. A 5° error in declination (degrees) off course would result in you being 4,600 feet off course on a 10 mile hike.
The first thing you need to know is where you are in relation to magnetic north. You can find this information by looking on your map legend. If you look at the map above showing declination you will see the line roughly marking 0 degree declination. If you are on the line where the declination is 0 degrees, then you don't have to worry about any of this, since magnetic north and map north are equivalent. If you are to the right of that line, your compass will point toward the line (to the left) and hence the declination is to the west. If you are to the left of the line, your compass will point toward the line (to the right) and hence the declination is to the east.
| If the declination is... | Then... | Map Bearing to Magnetic Bearing |
Magnetic Bearing to Map Bearing |
|---|---|---|---|
| West | Magnetic North < True North Map Bearing is < the Magnetic Bearing | Map Bearing + Declination = Magnetic Bearing. | Magnetic Bearing - Declination = Map Bearing. |
| East | Magnetic North > True North Map Bearing is > the Magnetic Bearing | Map Bearing - Declination = Magnetic Bearing. | Magnetic Bearing + Declination = Map Bearing. |
Compass Adjustments
Another way to deal with declination is to adjust your compass. Some compasses have an outer degree ring that can be unlocked either with a set screw or a latch. This allows you to reset the compass to account for declination. For example, if the declination were 14 degrees East, you could rotate the degree dial to the right so that the magnetic needle was pointing to 14 degrees instead of 360 degrees. Once you do this, you will no longer have to add or subtract for declination because your compass is aligned to true north. Now when the compass needle is inside the orienting needle, the compass bearing that you read off your compass will be in relation to true north instead of magnetic north. If you have a fixed-ring compass, you can mark the declination angle on the compass ring with a piece of tape.
As well as the magnetic deviation east or west, compasses also show a vertical "dip" up and down. This dip varies in different parts of the world and compasses are specially calibrated for that dip. So you can't take a compass made for North America and use it in South America and get accurate readings.
Bearings
A bearing is a measurement of direction between two points. Bearings are generally given in one of two formats, an azimuth bearing or a quadrant bearing.
- Azimuth bearing uses all 360°of a compass to indicate direction. The compass is numbered clockwise with north as 0° east 90° south 180° and west 270° So a bearing of 42° would be northeast and a bearing of 200° would be southwest, and so on.
- For quadrant bearings the compass is divided into four sections, each containing 90° The two quadrants in the northern half of the compass are numbered from 0° to 90° away from north (clockwise in the east, counterclockwise in the west). In the southern half of the compass, the two quadrants are numbered away from south (counterclockwise in the east, clockwise in the west). Quadrant bearings are given in the format of N 40° (northeast), S 26° (southwest), etc. Whenever you measure a quadrant bearing, it should always be recorded with north or south listed first, followed by the number of degrees away from north or south, and the direction (east or west) away from north or south.
How to take a bearing
Find the two points on the map that you want to travel from and to. Line up your compass edge between the two points, so that your direction-oftravel arrow is pointing to your destination
Rotate the compass housing until the orienting lines in the centre are pointing to the top of your map. You can do this by lining them up parallel to the grid lines.
Now rotate the dial until the north pointer lines up with the mark on the dial that joins the direction of travel arrow (this is called the index line).
Now read the bearing at the bottom of the direction-of-travel arrow, at the index line. You will need to take into account declination.
You must now re-orientate your compass. This means turning the whole compass around until the magnetic north needle points in the same direction as the orienting arrow. The way the direction-of-travel arrow is now pointing is the direction you must walk in to get to your destination.
It’s important to take regular bearings to stay on track. On long treks try and divide your journey up into short sections, taking new bearings from the landmarks that you pass on the way.
Triangulation
Triangulation is used to locate your position when three prominent landmarks are visible. Even if you are not sure where you are, you can find your approximate position as long as you can identify at least 3 prominent landmarks both on the land and on your map.
The Map
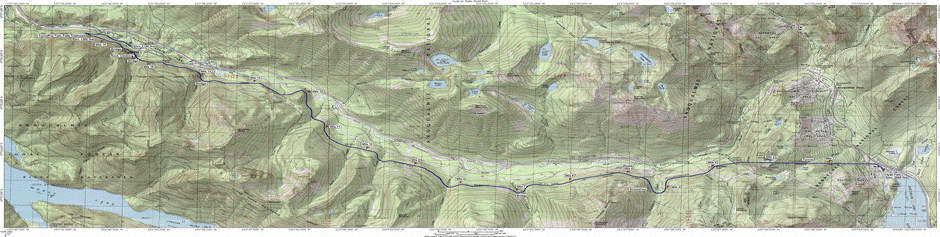
A map is a two-dimensional representation of the three-dimensional world. All maps have some basic features in common, learning to read these features is critical to navigation. The most useful map is a topographic map. A topographic map uses markings such as contour lines to simulate the three-dimensional topography of the land. In the U.S. these maps are usually U.S. Geological Survey (USGS) maps.
Scale
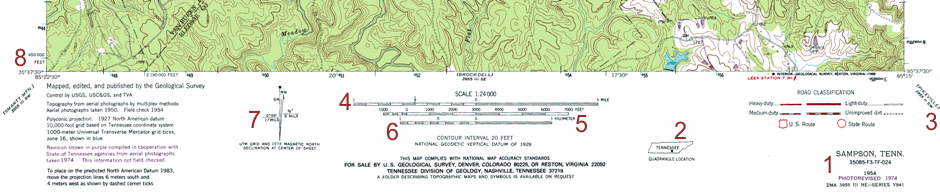
The scale of all maps are shown in their legend. A scale of 1:250,000 means that 1 unit on the map is the equivalent of 250,000 units in the world. Standard USGS topographic maps are either 1:24,000, also known as 7.5 minute maps, or 1:62,500, known as 15 minute maps.
| Map Size | Scale | Covers | Map to Landscape |
|---|---|---|---|
| 7.5 minute | 1:24,000 | 1/8 of a degree | 1 inch = 2,000 feet or 2.64 inches = 1 mile |
| 15 minute | 1:62,500 | 1/4 of a degree | 1 inch = 1 mile |
Legend
The legend contains important details.
Contour Lines
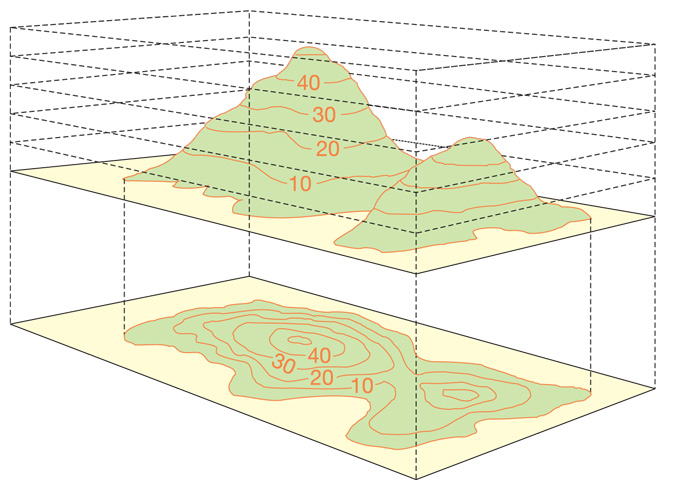
Contour lines are a method of depicting the 3-dimensional character of the terrain on a 2-dimensional map. A contour line is drawn between points of the same height, so any single contour line will be at the same height all the way along its length. These lines appear as thin orange or brown lines (index lines) with numbers on them. The number tells you the height above sea level of that line. The map legend will tell you the contour interval used.
The picture below shows how a landscape is converted into contour lines on a map.

Distances
There are a number of ways to measure distance accurately on a map. One is to use a piece of string or flexible wire to trace the intended route. After tracing out your route, pull the string straight and measure it against the scale line in the map legend. Another method is to use a compass (the mathematical kind) set to a narrow distance on the map scale like ½ mile and then "walk off" your route. It is a good idea to be conservative and add 5-10% of the total distance to take into account things like switchbacks that don't appear on the map. It's better to anticipate a longer route than a shorter one.